Every mechanical engineering student who graduates from NYCU’s Department of Mechanical Engineering takes home a unique memento: an aluminum, R-shaped bookend. This bookend was the midterm assignment for a required course, Workshop Practice, designed to introduce us to basic mechanical processes and critical safety protocols. We started with a plain aluminum sheet and were tasked with creating this R-shaped bookend from scratch, using various traditional machining techniques we had just learned in the course, such as band sawing, drilling, and hydraulic bending.
Though the final product may look simple, and I’m certainly no master craftsman, I truly enjoyed the hands-on experience of carefully shaping materials with specific tools. As a kid, my creations were limited to paper and cardboard because they were easy to cut and assemble with just scissors and tape. But to make something practical, something I could actually use in daily life, I realized the importance of stronger materials and more efficient processing methods. This is why I get excited every time I learn to use a new tool—just as I did with this R-shaped bookend project. Let’s take a closer look at how it was made.
Picture of the R-shaped bookend
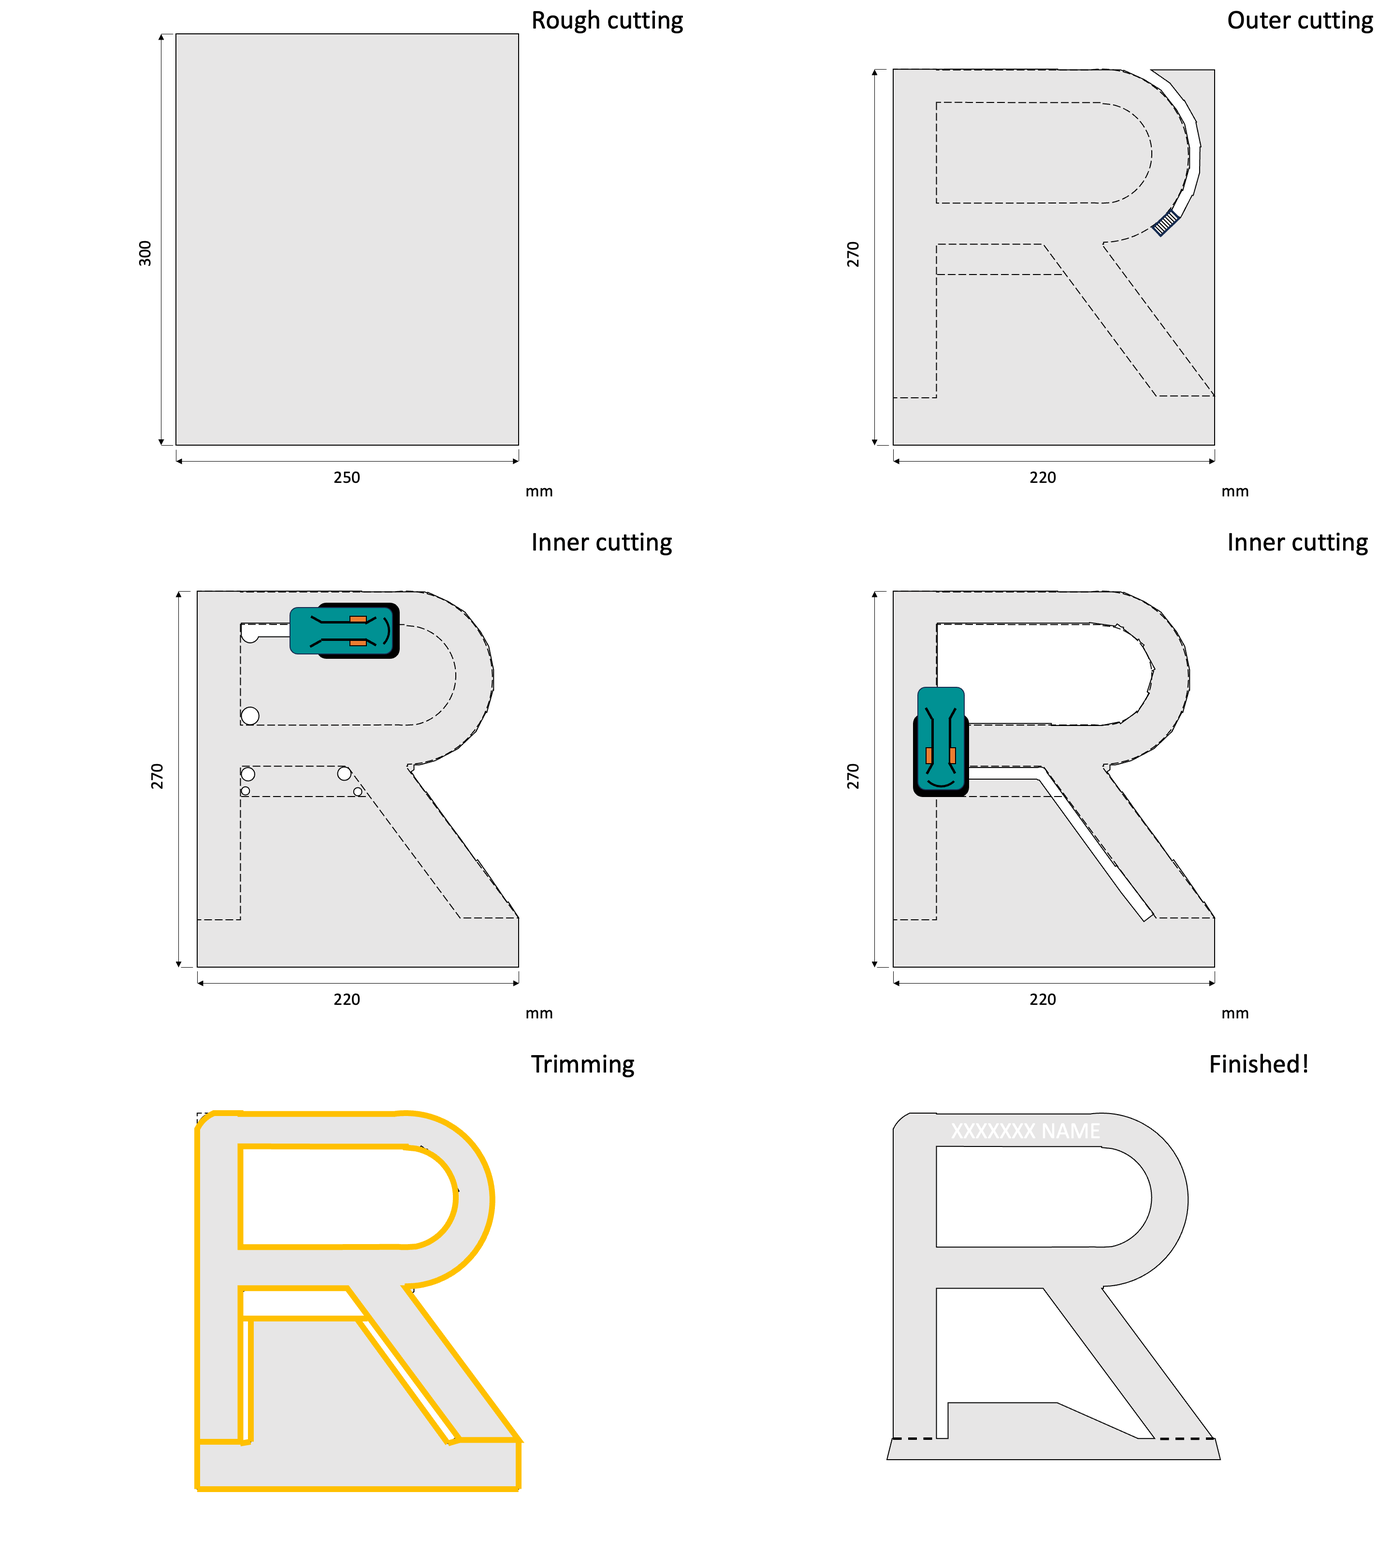
Processing steps
Animated processing (by powerpoint)
1. Rough Cutting - Circular Saw Machine
First, I used the circular saw machine to cut the aluminum sheet down to 220×270 mm. A press-cutting machine could work well too because the material is soft enough and the thickness is only 2 mm, but I personally don’t like the tapered cross-section it produces.
2. Outer Cutting - Band Saw Machine
To make the curved shape on the right side of the "R," I used a band saw machine while moving the sheet with my own hand. When operating a band saw, the most important thing to keep in mind is—do not rely too much on your "feeling" about the cutting path! It’s hard to judge whether your expected path is truly perpendicular to the orientation of the band saw. To avoid deviation, we must keep our eyes on the small rectangular area cut by the saw to see if it’s right on your path and adjust the placement accordingly. I always find my workpiece has to be rotated a little bit (in my view) to properly follow a straight line.
3. Inner Cutting - Jigsaw and Drilling
For cutting a hollowed inner shape, corner drilling is the first step to create a space for the jigsaw to start cutting and make sharp turns. The jigsaw is a great tool for cutting arbitrary shapes, but it does require some practice. A strong fixture on the workpiece is absolutely necessary. I prefer to work on a firm bench and step on the workpiece with one foot, placing the cutting path near the edge of the bench.
4. Fillet and Trimming - Rasp
These were the most time-consuming parts of the whole process. After the previous steps, there would be a lot of rough burrs at the edges and poor profile quality. Here, I used a vise clamp to fix the workpiece and trimmed it with various types of rasps. While we didn’t have a strict standard on how "fine" we should trim it, I think this reflects one's idea of self-requirement: how good is good enough? Anyway, trimming is almost like meditation for me.
5. Bottom Stand - Hydraulic Press
I used two L-shaped pressing dies to bend the bottom end by 90 degrees with a hydraulic press machine. It worked well, and nothing bad happened. :)
6. ID Tag - Laser Engraving
The ID and name tags were made using a laser engraving machine. The one in our school’s factory was integrated with a PC for online control and monitoring, so we could simply type in the words we wanted to print and specify the font, size, and coordinates. After properly positioning the workpiece and starting the machine, we could get our final product within a minute.
Conclusion
This was the first DIY project I completed at NYCU’s Department of Mechanical Engineering, and it truly sparked my passion for “learning by doing.” Creating this simple R-shaped bookend from scratch taught me valuable insights into general machining processes—details I hadn’t considered initially, like the importance of drilling holes before making inner cuts. The excitement and satisfaction I felt took me back to my childhood days of crafting with paper and cardboard, but this time, with real tools and materials.
As the first post on Bruce’s Makes, I hope this project continues to ignite curiosity and inspire more hands-on creations in the future.

